
1. Purpose and learning objectives
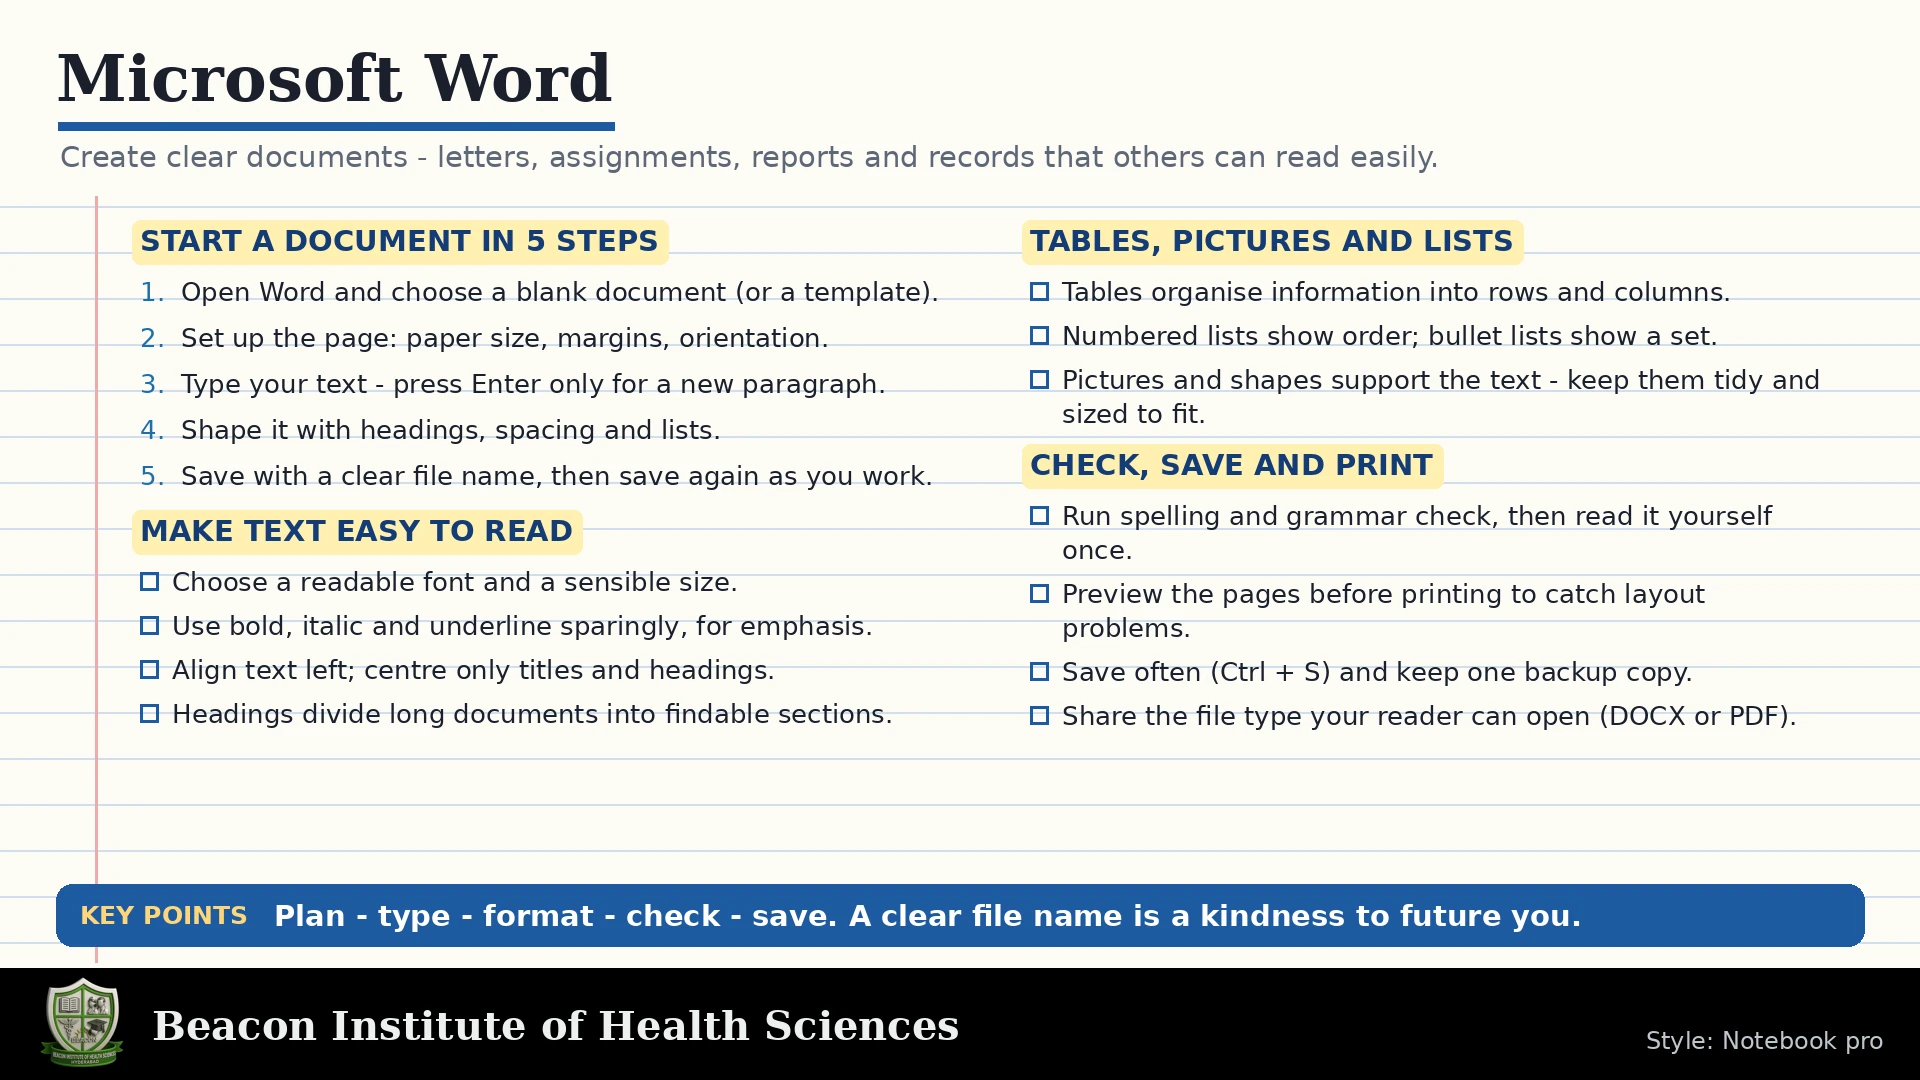
Objectives: create, organize, format, revise and share an academic document in Microsoft Word. Word is a word processor, suitable for assignments, reports, letters and teaching handouts. It is not a substitute for an approved clinical record system. Use fictional information for exercises. Controls differ across desktop, web and mobile editions; look for equivalent commands rather than assuming identical menus.
2. Creating and saving documents
Document creation: start with a blank file or appropriate template. Identify the purpose, reader and required layout. Save early in an approved folder using a meaningful filename. .docx remains editable; PDF normally preserves the displayed layout for distribution. A PDF still needs inspection. AutoSave and version history depend on storage and settings; do not assume every document is backed up.
3. Understanding the interface
Interface concepts: the ribbon groups commands; the insertion point marks where text is entered. Select text before formatting it. A paragraph ends at a paragraph mark, not at each displayed line. Let text wrap naturally. Use Enter for a new paragraph and a page break for a new page. Repeated blank lines create unstable layout.
4. Editing and proofreading
Editing: use cut, copy, paste and undo carefully. Paste can bring unwanted formatting, so choose a suitable paste option. Find locates words; Replace changes matching text, but replacing all can alter unintended phrases. Check context and review results. Grammar suggestions are aids, not proof that meaning or facts are correct.
5. Styles and document structure
Styles: apply Heading 1, Heading 2 and normal paragraph styles consistently. Styles support navigation, accessibility and automatic contents lists. Do not imitate headings using only bold and larger text. Use a readable font, adequate spacing, clear alignment and consistent emphasis. Avoid underlining ordinary headings when it can resemble a hyperlink.
6. Page layout
Page layout: choose margins, paper size and orientation required by the assignment. Use paragraph spacing instead of empty lines. Use headers and footers for consistent information and page numbers. Sections can allow different page formatting; they require careful review. Print preview helps identify page breaks and awkward splits.
7. Lists and tables
Lists and tables: use actual bullets or numbering. Tables are useful for exact comparisons or schedules; provide clear column headings. Keep tables simple and avoid unnecessary merged cells. Do not align text with repeated spaces. For a long table, repeat its header where supported and check that rows remain readable across pages.
8. Images and alternative text
Images: insert an appropriate image, retain its aspect ratio, select sensible text wrapping and add meaningful alternative text. A decorative picture may be marked decorative when supported. Give a caption and source when needed. Do not use patient photographs or screenshots without approved permission and handling. Images should explain the topic, not distract.
9. Citations and references
References: identify sources during drafting and follow the required citation style. Word can help manage citations, but names, dates and publication details must be checked. A bibliography does not make copied paragraphs original. Paraphrase faithfully, distinguish quotation from your writing and verify hyperlinks. Update an automatic table of contents after editing headings.
10. Review and collaboration
Review and collaboration: use comments for discussion and Track Changes for recorded revisions. Accept or reject changes deliberately. Deleting visible text is different from removing comments and revision history. Inspect the final file before sharing and use the institution's approved permissions. Coauthoring requires compatible storage and settings; avoid multiple competing final copies.
11. Accessibility and final checking
Accessibility: use descriptive headings, meaningful links, sufficient contrast and simple tables. Do not communicate meaning by color alone. Run the accessibility checker where available and inspect remaining issues manually. Spelling review cannot detect every wrongly chosen word or numerical error. Read the finished document from beginning to end.
12. Model report assignment
Model assignment: create a fictional one-page skills-laboratory report with title, purpose, activities, findings and recommendations. Add a three-row equipment table and page number. Use heading styles, revise two sentences with Track Changes and add a source. Save an editable copy and export PDF; open both and compare pages. Do not enter real student or patient identifiers.
13. Troubleshooting
Troubleshooting: unexpected blank page may come from page breaks or paragraph marks; display formatting marks to investigate. Misaligned text may be caused by spaces instead of tabs or tables. Large pictures may cause layout changes. Undo reversible errors, then correct the structure. Do not remove unfamiliar section breaks without checking their effect.
14. Answered review and recap
Answered practice: Why use styles? Consistency, navigation and accessible structure. Which format remains readily editable? .docx. Does exporting PDF remove all confidentiality concerns? No. Why inspect Replace All? It may change unintended text. What comes before distribution? Proofreading, permission review and opening the final file. Recap: structure first, consistent formatting second, careful verification before sharing.
15. Worked learning activities and final checks
A model classroom report can begin with a short purpose statement, followed by activities, observations and recommendations. For example, describe a fictional orientation session in which students learned folder management and typing. Report what was practised rather than claiming that the session improved patient outcomes. In a small table, use columns for activity, practice completed and next learning step. Keep conclusions connected to the observations described.
For a revision exercise, write a long sentence, then split it into two clear sentences. Check that the meaning remains accurate. Add a comment explaining the reason for the edit and record the change with Track Changes. A reviewer can then inspect the original and proposed wording. When preparing the final distribution copy, accept or reject changes deliberately and confirm that comments and unnecessary private information are removed according to policy.
A structure exercise is to apply Heading 1 to main sections and Heading 2 to subsections. Open the navigation pane where available and check whether the hierarchy makes sense. Create a contents list from those headings, then rename a section and update the list. This demonstrates why real styles are more useful than manually formatted headings. Check that page numbers and headings in the final PDF agree with the editable document.
Before sharing a handout, inspect it at ordinary reading size. Check whether the font is readable, the table fits the page and image labels can be understood. Confirm the filename, file type, recipient and sharing permissions. Open the exported PDF independently. A successful export message shows that a file was created; it does not prove that the layout, content or destination is correct.